
This week's Fab Acadamey assignment was quite straight forward: 3D scan something and 3D print something, preferably the same thing.

However, when it came to exporting the STL, I found that ScanStudio (the NextEngine software) outputted all my various scans superimposed on top of each other. It took me a few days to get round to looking at theis problem, so didn't get to print my scan - will do that when I next get a chance. In the end it turned out that the culprit was a checkbox in the Output (or Save As) window of ScanStudio that needs checking in order to export only the green attached meshes. Having done that, The stl still had some holes in it that ScanStudio couldn't fix (that file is here), so I imported it into Meshlab and used a Poisson reconstruction filter to reconstruct a closed mesh. This always works, but one does lose some of the original level of detail of the scan. That file is here. I also tried the netfabb cloud STL fixing service, which did a much better job (and quick!) of fixing the holes but retaining the original point data. That file is here.
I shall put up photos of the print as and when it is done.
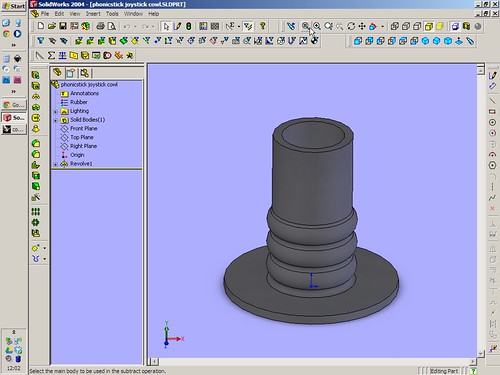
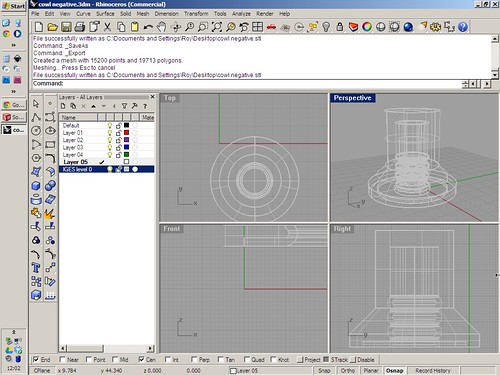
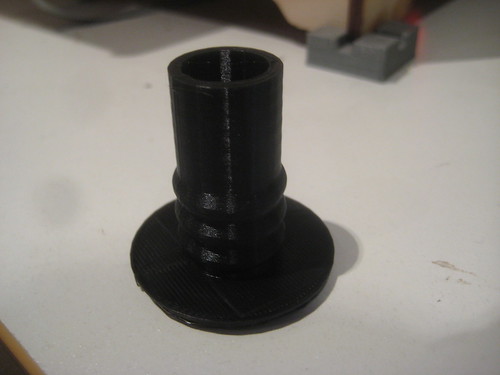
I used our Ultimaker to print a model I had made in Solidworks for a current project - a sheath for a joystick. I also used Rhino to make a negative of the joystick part in the hope that I could directly print a mould for casting a silicone version of the sheath in. The print went fine, but it remains to be seen if this casting method will work! Here is the .stl file for the basic sheath and here is the file for the mould.
The printing was fairly straightforward again, just one failure early on in the first attempt at printing the mould. As Jon in the lab showed me, this was due to the initial z height of the stage being slightly off, so the first layer was effectively printing in midair, not getting a good bond to the build platform. With the second attempt, things went much smoother, and I cranked up the print speed to 150%, approx 70mm/s, with still good results. I like the Ultimaker.

3D Scanning
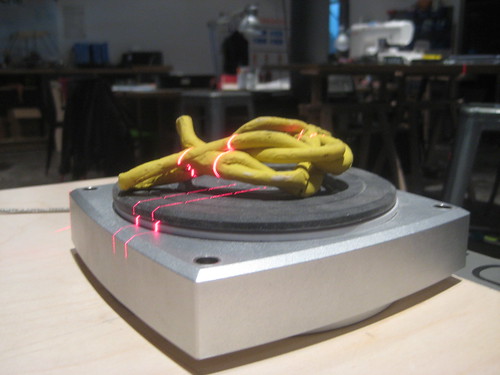
I have already gotten to grips fairly well with the NextEngine 3D scanner in MAKlab, and have written a tutorial based on my efforts over at Instructables here. I will pop it up in the Fab Academy content archive when I figure out how to get access. I chose to scan a model for Caroline in the lab - she is interested in knots and has modelled some nicely complex forms in plasticine that make great subjects for 3D scanning, because of their complexity and the plasticine is just the right sort of surface to scan quite reliably with the NextEngine. So I did a test single scan followed by a couple of 360 degree scans, with the model in different orientations so that the scanner could get to 'see' every surface - the scanner works on the structured light principle, so projects a laser array onto the object sa you can see in the video below. As a result it is easy for it to miss parts of the model geometry that are in shadow with respect to these laser lines. I've found that a large part of the challenge of 3D scanning is simply rigging the object so that it CAN be scanned! You can see the two orientations I used below.STL Exporting issue
However, when it came to exporting the STL, I found that ScanStudio (the NextEngine software) outputted all my various scans superimposed on top of each other. It took me a few days to get round to looking at theis problem, so didn't get to print my scan - will do that when I next get a chance. In the end it turned out that the culprit was a checkbox in the Output (or Save As) window of ScanStudio that needs checking in order to export only the green attached meshes. Having done that, The stl still had some holes in it that ScanStudio couldn't fix (that file is here), so I imported it into Meshlab and used a Poisson reconstruction filter to reconstruct a closed mesh. This always works, but one does lose some of the original level of detail of the scan. That file is here. I also tried the netfabb cloud STL fixing service, which did a much better job (and quick!) of fixing the holes but retaining the original point data. That file is here.
I shall put up photos of the print as and when it is done.
3D Printing
I used our Ultimaker to print a model I had made in Solidworks for a current project - a sheath for a joystick. I also used Rhino to make a negative of the joystick part in the hope that I could directly print a mould for casting a silicone version of the sheath in. The print went fine, but it remains to be seen if this casting method will work! Here is the .stl file for the basic sheath and here is the file for the mould.
The printing was fairly straightforward again, just one failure early on in the first attempt at printing the mould. As Jon in the lab showed me, this was due to the initial z height of the stage being slightly off, so the first layer was effectively printing in midair, not getting a good bond to the build platform. With the second attempt, things went much smoother, and I cranked up the print speed to 150%, approx 70mm/s, with still good results. I like the Ultimaker.


1 comment:
Cool update I found here.
Post a Comment