
Programming
I decided to start with programming my Hello Echo board with the Arduino IDE as I was most familiar with this. Firstly I used the blink example code available in the Arduino program, and the pinout conversions given in this Providence tutorial. To my delight, it worked first time - great tutorial! I then tried using the button to control the LED, using the example button code in Arduino. Confusingly, I couldn't get the button to work as an input and, measuring the voltage on the button pin eventually realised that the pin was not being pulled up by the internal pullup resistor but still floating. Hence the chip could not tell when it was being grounded by the button. After some long troubleshooting with Joel, he put me onto a tutorial that goes into more detail on the internal pullup resistors and Arduino (sadly I cannot find it now). This described how one must activate the internal pullup resistor by sending the output high directly after setting it up in the void(setup) - contrary to the order of things in C code. Suddenly, the board worked a treat. Here is the code:
/*
Button
Turns on and off a light emitting diode(LED) connected to digital
pin 7, when pressing a pushbutton attached to pin 8.
The circuit:
* LED attached from pin 7 to ground
* pushbutton attached to pin 8 from GND
created 2005
by DojoDave
modified 30 Aug 2011
by Tom Igoe
modified by Roy May 2013
This example code is in the public domain.
http://www.arduino.cc/en/Tutorial/Button
*/
// constants won't change. They're used here to
// set pin numbers:
const int buttonPin = 7; // the number of the pushbutton pin
const int ledPin = 8; // the number of the LED pin
// variables will change:
int buttonState = 0; // variable for reading the pushbutton status
#include
#define rxPin 0
#define txPin 1
// set up a new serial port
SoftwareSerial mySerial = SoftwareSerial(rxPin, txPin);
void setup() {
// initialize the LED pin as an output:
pinMode(ledPin, OUTPUT);
// initialize the pushbutton pin as an input:
pinMode(buttonPin, INPUT);
digitalWrite(buttonPin, HIGH);
// Open serial communications and wait for port to open:
mySerial.begin(4800);
mySerial.println("Hello, world?");
}
void loop(){
// read the state of the pushbutton value:
buttonState = digitalRead(buttonPin);
mySerial.println(buttonState);
// check if the pushbutton is pressed.
// if it is, the buttonState is HIGH:
if (buttonState == HIGH) {
// turn LED on:
digitalWrite(ledPin, LOW);
}
else {
// turn LED off:
digitalWrite(ledPin, HIGH);
}
}
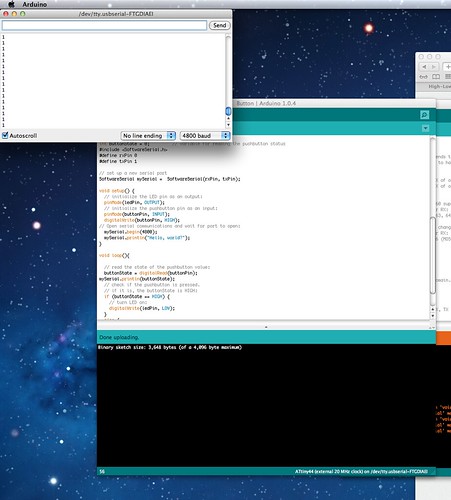
You might notice I also implemented some serial commuication in there using the SoftwareSerial command as the regular serial commands don't work with the ATtiny45. This meant that I could see on screen what the output state of the button was:


No comments:
Post a Comment